

Example 2: Creating a Table of Contents with XSLT
In this example, we'll create a table of contents as a list of links to our
dinosaurs using XSLT, without changing the source XHTML page. This is an example
of generating new content automatically from existing content � and it's useful
for creating navigation, cross-references, summaries, and so on.
The benefits of doing this in XSLT are:
·
The table of contents will automatically update when the list
of dinosaurs changes. This wouldn't have been the case if we'd just used static
HTML.
·
The table of contents can easily be generated from existing
XHTML. If we were generating such an index with a scripting language like
ASP, we'd probably want to do this in a more complex way by pulling the information
out of a database or separate data file instead.
·
We gain even more bandwidth savings than in the last example.
With our header and footer example above, the header and footer data was only
downloaded once. This time, the HTML for the table of contents isn't downloaded
at all. Instead, the browser only needs to download the rules to create the
table.
·
As in the previous example, no server-side processing is required
to generate the table of contents, reducing load on the server.
How else could we do it?
·
By using a server-side scripting language (such as ASP, PHP,
or JSP) to generate the list of contents from a data source or by parsing
the existing HTML
·
By using JavaScript to manipulate the DOM client-side, and
using document.write to create HTML
Create a new copy of dinosaur_1.xml,
and call it dinosaur_2.xml (or find
it in the code download for this chapter). Change the first line of dinosaur_2.xml to reference
a new stylesheet:
<?xml-stylesheet type="text/xsl" href="contents_2.xsl"
?>
and create
contents
_2.xsl in the same
folder, using the code below (replacing the first line as described above,
if necessary):
<xsl
:stylesheet version="1.0" xmlns:xsl="http://www.w3.org/1999/XSL/Transform">
<xsl:template
match="/">
<xsl:apply-templates
/>
</xsl:template>
<xs:template
match="node()|@*">
<xsl:copy>
<xsl:apply-templates
select="node()|@*"/>
</xsl:copy>
</xsl:template>
<xsl:template
match="body">
<body>
<table style="border:
solid thin black">
<tr>
<td><a
href="mammoth.html">Visit the Mammoth zone!</a> - </td>
<td><a
href="play.html">Play Pteranodon Poker</a></td>
</tr>
</table>
<h2>Quick
reference</h2>
<ul>
<xsl:for-each
select="h2">
<li>
<a>
<xsl:attribute
name="href">
#<xsl:value-of
select="text()"/>
</xsl:attribute>
<xsl:value-of
select="text()"/>
</a>
</li>
</xsl:for-each>
</ul>
<xsl:apply-templates
/>
<hr />
Copyright 2002
DinosaurOrg.
</body>
</xsl:template>
<xsl:template
match="h2">
<a>
<xsl:attribute
name="name"><xsl:value-of select="text()"/></xsl:attribute>
<h2><xsl:apply-templates/></h2>
</a>
</xsl:template>
</xsl
:stylesheet>
Here's how dinosaur
_2.xml
should look in a browser:
Hunting for Dinosaurs
with <xsl:for-each>
The first few lines of contents
_2.xsl
are the same as in our previous example � defining the version and namespace,
making sure IE 5 and IE 5.5 perform transformations, defining the Identity
Transformation, finding the <body> tag, and inserting the header
links. We then add some more content to the header, using the following section
of the stylesheet:
<h2>Quick
reference</h2>
<ul>
<xsl:for-each
select="h2">
<li>
<a>
<xsl:attribute
name="href">
#<xsl:value-of
select="text()"/>
</xsl:attribute>
<xsl:value-of
select="text()"/>
</a>
</li>
</xsl:for-each>
</ul>
The first two lines of this section give a header and begin the list for
our TOC, and the last line closes it. The interesting bit comes in the middle.
Here, we set up a loop to find all <h2>tags in the
<body> element content, and create a
list of anchor links based on the contents of these
<h2> tags. Becauseall
of our dinosaur names in the page are nicely wrapped in
<h2> elements (for example,
<h2>Tyrannosaurus Rex</h2>), this
becomes a list of links to our dinosaurs.
For each <h2> in the body
of the page, we first output an <li>
tag. We then create an <a>
tag, use xsl:attribute
to add an attribute called 'href',
and set this attribute to be a hash symbol followed by the content of the
<h2> tag. We then close the
href attribute. We use the text content of
the <h2> tag again to output
the dinosaur name as visible text for the link, and finish off with an
</a> tag to close the link. Finally,
we close our <li>element,
and end the for-each loop with
</xsl:for-each>,
giving (for example):
<
li><a href="#Tyrannosaurus Rex">Tyrannosaurus
Rex</a></li>
For dinosaur
_2.xml,
the complete block of navigation created by this code looks like this:
<h2>Quick reference</h2>
<
ul>
<li><a
href="#Brontosaurus">Brontosaurus</a></li>
<li><a
href="#Tyrannosaurus Rex">Tyrannosaurus Rex</a></li>
<li><a
href="#Stegosaurus">Stegosaurus</a></li>
</ul>
Let's add a pterodactyl to
dinosaur
_2.xml:
<h2>Pterodactyl</h2>
A Pterodactyl can fly
round at high speeds.
<
ul>
<li><b>Weight:</b>
0.05 tons</li>
<li><b>Length:</b>
2 m</li>
<li><b>Color:</b>
Gray</li>
</ul>
Reload dinosaur_2.xml, and
the Pterodactyl will be added to the contents list without the need for us
to change the stylesheet.
Now that we have created a list of links, we need to add some <a
name="xxxx"> tags to our dinosaurs further down the page
to give the links somewhere to link to. The stylesheet above contains a new
template to transform the <h2> element:
<xsl:template
match="h2">
<a>
<xsl:attribute
name="name"><xsl:value-of select="text()"/></xsl:attribute>
<h2><xsl:apply-templates/></h2>
</a>
</xsl:template>
When we call <xsl
:apply-templates /> in the middle of the
<body> template, any
<h2> tags within the body content will
be transformed using this new template, rather than the Identity Transformation.
><h2> tags are transformed from:
<h2>Tyrannosaurus
Rex</h2>
&to:
<a name="Tyrannosaurus
Rex"><h2>Tyrannosaurus Rex</h2></a>
So, we've seen how to generate new content from an existing XHTML document.
This is a good technique to use when you have existing HTML that has a regular
format, and want to add information and change formatting without completely
altering your source documents.
Which template will be applied?
There is a reason for the ordering of templates we have used in the examples
above. This is because of a difference between how the XSLT 1.0 standard
and XSL-WD prioritize templates, if several could match the same node.
In XSLT 1.0, <xslt:template> has a
priority attribute that allows you to specify
which template will be applied if there are several that match a node. A
higher priority indicates that the template will be applied preferentially.
If no priority is specified, then the order in which templates are applied
is quite complicated. The full process is described in section 5.5 of the
XSLT specification (http://www.w3.org/TR/xslt#conflict),
but the essence of it is that, of all the templates that could match an
element, the most specific is always used. In
Example 2,
the identity template will match every node, including the
<body> element, but because we specifically
look for <body>, that rule
will apply. If we were just targeting XSLT 1.0-compatible browsers, we could
put the templates in any order, and rely on these rules to apply the correct
templates.
This is not true of XSL-WD in IE 5.0 and IE 5.5. In these browsers, the
matching template that is listed last in the XSL file is the one that will
be used. This often means that you need to re-order the templates in an
XSL file intended for IE 5 to make it work the same way as in IE 6. For
this reason, we have placed the Identity Transformation at the top of our
stylesheets. If we put it at the bottom, it would override all other templates
in IE 5.0 and IE 5.5.
Example 3: Separating
Design from Content
So far, we've been basing our transformations on an XHTML document, containing
layout information for our content. This is fine, but in order to gain the
real benefits of XML and XSLT, we'd like to be able to remove all
layout code from the source file, and store all design transformations within
an XSLT stylesheet.
The benefits of doing this in XSLT are:
·
The source XML document contains useful structured content
without needing to be concerned about the layout of that content. This makes
content reuse and content sharing much easier.
·
Layout and design can be completely changed in the future without
the need to change the underlying content.
·
It is easy to produce several different versions of the same
document � for example, for mobile devices, for internationalization, or for
accessibility.
The bandwidth savings are potentially even greater than
in the previous examples, as all
design and layout rules are defined and downloaded once only.
·
XML can be automatically validated using a DTD or a schema.
This ensures that XML conforms to your specific document rules, and allows
you to enforce document requirements.
How else could we do it?
·
By using a server-side scripting language (such as ASP, PHP,
or JSP) to pull the page contents from an XML document, or some other storage
mechanism such as a data file or database, and then generate HTML from this
content based upon rules defined in the script.
·
As we saw in Chapter 4, CSS can be used to style XML
within the browser. However, CSS does not give the level of complete control
that we get with XSLT.
Even though CSS on its own cannot do as much as XSLT, it's very powerful
when used alongside XSLT. CSS is much better for applying styles to content,
but cannot make the wholesale transformations that are possible with XSLT.
Moving from XHTML
to Raw XML
Let's remove all design from our source
XML file, and create a new file, dinosaur_3.xml, as shown below:
<?xml-stylesheet type="text/xsl" href="xml2html_3.xsl"
?>
<dinosaurs>
<dinosaur name="Brontosaurus">
<description>
A Brontosaurus is big and scary.
</description>
<weight>200</weight>
<length>90</length>
<color>Blue</color>
<discoverer>Primrose
McFadden</discoverer>
</dinosaur>
<dinosaur name="Tyrannosaurus
Rex">
<description>
A Tyrannosaurus Rex would eat you.
</description>
<weight>50</weight>
<length>20</length>
<color>Red</color>
<discoverer>George
Grimble</discoverer>
</dinosaur>
<dinosaur name="Stegosaurus">
<description>
A Stegosaurus has lots of spiny
plates.
</description>
<weight>25</weight>
<length>20</length>
<color>Green</color>
<discoverer>Charles
Degramy</discoverer>
</dinosaur>
</dinosaurs>
dinosaur_3.xml
is much simpler than our previous XHTML files, and contains all of the important
information about dinosaurs without needing to concern itself at all with
how this information is displayed. We've also introduced a new item for each
dinosaur, namely <discoverer>
.
Styling the XML with
XSLT
We'll create a new stylesheet,
xml2html
_3.xsl
,
to transform our XML file. Change the first line for XSL-WD
if you need to, as described above (you can find the XSL-WD-friendly version
in the code download too,
as xml2html
_ie5
_3.xsl
).
<xsl:stylesheet version="1.0" xmlns:xsl="http://www.w3.org/1999/XSL/Transform">
<xsl:template
match="/">
<xsl:apply-templates
/>
</xsl:template>
<xsl:template
match="text()" />
<xsl:template
match="dinosaurs">
<html>
<head>
<title>A
simple HTML page</title>
<style type="text/css">
body
{ font-family: Verdana, Times, Serif; }
</style>
</head>
<body>
<table style="border:
solid thin black">
<tr>
<td><a
href="mammoth.html">Visit the Mammoth zone!</a> - </td>
<td><a
href="play.html">Play Pteranodon Poker</a></td>
</tr>
</table>
<h1>My
big list of dinosaurs</h1>
<xsl:apply-templates
/>
<hr/>
Copyright 2002
DinosaurOrg.
</body>
</html>
</xsl:template>
<xsl:template
match="dinosaur">
<h2><xsl:value-of
select="@name"/></h2>
<xsl:value-of
select="description/text()"/>
<ul>
<xsl:apply-templates/>
</ul>
</xsl:template>
<xsl:template
match="weight">
<li><b>Weight:
</b><xsl:value-of select="text()" /> tons</li>
</xsl:template>
<xsl:template
match="length">
<li><b>Length:
</b><xsl:value-of select="text()" /> m</li>
</xsl:template>
<xsl:template
match="color">
<li><b>Color:
</b><xsl:value-of select="text()" /></li>
</xsl:template>
</xsl:stylesheet>
The beginning of this stylesheet looks remarkably like our previous example
except that, rather than searching for a <body> element,
we instead search for the <dinosaurs>
element. Because our XML file contains no HTML at all, the stylesheet has
to include the <html> and
<head> elements in its transformation
this time round. Likewise, the template for the
<dinosaurs> element must close the
<html> element at the bottom of the page.
Rather than search for an <h2>
tag to find out our individual dinosaur names, this stylesheet searches for
the <dinosaur> element and
references its nameparameter. This
is much better than the previous approach of matching the <h2>
tag, as you may have other <h2>
tags in your document that don't refer to dinosaurs.
<xsl:template
match="dinosaur">
<h2><xsl:value-of
select="@name"/></h2>
<xsl:value-of
select="description/text()"/>
<ul>
<xsl:apply-templates/>
</ul>
</xsl:template>
The @name reference on line 2 of
this section points to the value of the name attribute of the
<dinosaur> tag, transforming
<dinosaur name="Tyrannosaurus Rex">
into <h2>Tyrannosaurus Rex</h2>
.
The description/
text() reference on line 3 then points to the text contents
of the <description> child
element for our current <dinosaur>
element. <xsl:apply-templates
/> then tells the XSLT processor to apply any templates to the contents
of the <dinosaur> element �
in this case, <weight>, <length>,
and <color>. We have defined templates for
these three tags, and so they are translated by their templates into the same
HTML code as in our previous examples.
Removing Content with
XSLT
You may have noticed that we haven't provided an
<xsl:template>
for our new <discoverer> element.
Additionally, we haven't included the identity transformation in this stylesheet,
so as a result our <discoverer>
element is ignored. Don't worry, we won't forget the dinosaur discoverers
completely � we'll come back to them in
Chapter 6 and make sure they get the credit
they deserve.
This does show how easy it is to exclude content with XSLT � one application
for this would be to strip out confidential company information when an internal
document is republished on an extranet. (However, this would have to be done
with server-side XSLT, not client-side,otherwise
a simple View
Source would show the hidden information.)
Our decision to exclude the identity transformation from this example is
because the output of this stylesheet is very different from the source XML
file. As we saw earlier, the identity transformation is useful when the output
is very similar to the source and we wish to leave most things unchanged.
We have added a new template:
<xsl:template match="text()" />
XSLT has a built-in rule for text, specifying that any text in the source
XML is passed through unchanged by default. In this example we don't want
this to happen � we want to suppress text, and only display it when we specifically
match it with value-of rules. If
we didn't include this text() template,
the names of our explorers (which are text nodes in the XML tree) would be
passed through and displayed, even though we have not given a rule for their
parent (the <discoverer>tag).
The resulting web page from these transformations is essentially the same
as the one shown in
Example 1 earlier, only this time we started
with simple, reusable XML.
XPath � We've Used
It a Lot Already, Without Even Noticing
So far, we've used XPath several times without really explaining what it
is. In the template above, where we use:
<xsl:value-of select="description/text()" />
&we are using an XPath statement to reference the text child of the description element that is a child of the
current node. Again, in the template:
<xsl:template match="body">
&we are using XPath to reference the element identified by the name "body".
XPath is used inside the match and
selectattributes of many XSLT elements,
to choose nodes in the input document, and to alter them. XPath consists of
two parts � the path-like document navigation parts shown above, and a set
of JavaScript-like functions like substring.
These functions will only work in XSLT 1.0, so we will cover some examples
of them in the next chapter.
To select attributes with XPath, we just use the attribute name with an
"@" in front of it. For example, to output the href
attribute of an < a> element
we were currently on, we use:
<xsl:value-of select="@href" />
We can also write our XPath so that we match only elements that have a
certain attribute. For example, to match only those < dinosaur>
elements that have a name attribute,
we'd use:
<xsl:template match="dinosaur[@name]" />
It is possible to use conditional statements within XPath as well � for example,
to match only the dinosaur with name "Triceratops", we'd use:
<xsl:template match="dinosaur[@name='Triceratops']" />
Conditions can be combined with "and"
and "or",
for example:
<xsl:template match="dinosaur[@name='Brontosaurus' or @name=
'Triceratops']" >
&will match the <dinosaur> elements with the name "Brontosaurus"
or "Triceratops".
We can also match elements that have a specific parent � for example:
<xsl:template match="description/b" >
&would only match <b> tags
that were directly inside the <description>,
while:
<xsl:template match="description//b" >
would match <b> tags that were within the description, directly or not. For example,
in the following description, the <b>
would be matched by the description//b
XPath, but not by description/b
.
<description>A Brontosaurus is <i><b>big</b>
and scary.</i></description>
XSL-WD doesn't support the full XPath specification, and so this is the limit
of what's possible using XSL-WD inside IE 5.0 and IE 5.5. There are a lot
more possibilities available using XSLT 1.0, such as accessing the parent
and the siblings of the current node, and a set of functions that includes
substring, count, and contains that we'll talk about more in Chapter 6.
XPath is a large subject, and we have barely touched upon it here. However,
not too much of it is necessary for everyday use. We will explain more of
XPath as we go through the examples below and in the next chapter. A complete
XPath reference can be found at http://www.zvon.org/xxl/XSLTreference/Output/index.html,
while the XPath specification is available at http://www.w3.org/TR/xpath.
 It introduces XSLT, going through the basics of using it to transform XML on the client-side, by way of easy-to-follow tutorial examples (we have included the first three examples here). Chapter 6 of the book takes client-side XSLT to a more advanced level, and Chapters 8-11 include coverage of server-side XSLT usage.
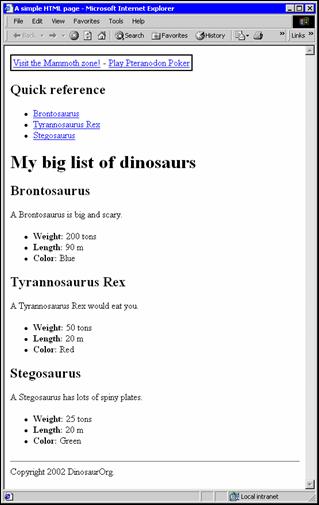
 George Petrov is a renowned software writer and developer whose extensive skills brought numerous extensions, articles and knowledge to the DMXzone- the online community for professional Adobe Dreamweaver users. The most popular for its over high-quality Dreamweaver extensions and templates.
Comments
Be the first to write a comment
You must me logged in to write a comment.