 It introduces XSLT, going through the basics of using it to transform XML on the client-side, by way of easy-to-follow tutorial examples (we have included the first three examples here). Chapter 6 of the book takes client-side XSLT to a more advanced level, and Chapters 8-11 include coverage of server-side XSLT usage.
This sample is taken from Chapter 5 "Introduction to XSLT"of the glasshaus title "Practical XML for the Web".


An Aside on XHTML Namespaces
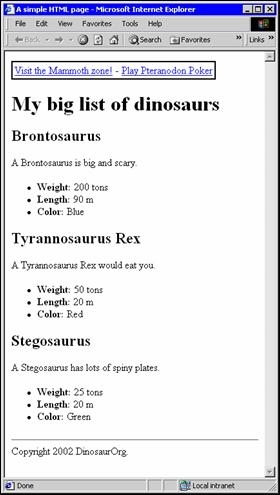
If you're familiar with XHTML, you may have realized that the page above
is not strictly conforming to XHTML. It is lacking an xmlns attribute in the <html> root element, and there is no
DOCTYPE declaration at the beginning of the document.
An XSLT stylesheet will normally act on elements in the default namespace.
If the xmlns attribute was present
in the source document, then all of the document
elements would be in the XHTML namespace. This means that the template match
in the stylesheet for the <body>
element would have no effect � it would be looking in the wrong namespace
for the match.
In order to make the match correct, we need to tell the stylesheet about
the XHTML namespace. Just as in the source document, we do this with an xmlns
attribute, giving the URI for the XHTML namespace. The amended xsl
:stylesheet element would look like this:
<xsl:stylesheet version="1.0" xmlns:xsl="http://www.w3.org/1999/XSL/Transform"
xmlns:html="http://www.w3.org/1999/xhtml">
Having done this, we can now refer to the body element as html:body, thus:
<xsl:template match="html:body">
The reason for leaving this out of the example is to keep it simple � and
most of the time, it's enough to use the default namespace.
Creating Your First XSLT Stylesheet
Here's our first XSLT stylesheet, headerfooter_1.xsl:
<xsl:stylesheet version="1.0" xmlns:xsl="http://www.w3.org/1999/XSL/Transform">
<xsl:template
match="/">
<xsl:apply-templates
/>
</xsl:template>
<xsl:template
match="node()|@*">
<xsl:copy>
<xsl:apply-templates
select="node()|@*"/>
</xsl:copy>
</xsl:template>
<xsl:template
match="body">
<body>
<table style="border:
solid thin black">
<tr>
<td><a
href="mammoth.html">Visit the Mammoth zone!</a> - </td>
<td><a
href="play.html">Play Pteranodon Poker</a></td>
</tr>
</table>
<xsl:apply-templates
/>
<hr/>
Copyright 2002
DinosaurOrg.
</body>
</xsl:template>
</xsl:stylesheet>
If you are using IE 5 or IE 5.5, you should replace the second line of code
in the stylesheet (ignoring all comment lines) with:
<xsl:stylesheet xmlns:xsl="http://www.w3.org/TR/WD-xsl">
This file is already present in the code download as headerfooter_ie5
_1.xsl. Save your
stylesheet in the same folder as
dinosaur_1.xml
, and then view
dinosaur
_1.xml
in a browser
:
As if by magic, exciting links to the Mammoth Zone and Pteranodon Poker appear
at the top of our page, together with a copyright message in the footer. But
how?
 George Petrov is a renowned software writer and developer whose extensive skills brought numerous extensions, articles and knowledge to the DMXzone- the online community for professional Adobe Dreamweaver users. The most popular for its over high-quality Dreamweaver extensions and templates.
Comments
Be the first to write a comment
You must me logged in to write a comment.