Free: Using Advanced HTML Editor to Create a Content Management System Support
In this free, 20 page tutorial, Matt Machell shows you how to use Dreamweaver server behaviours and the DMXzone Advanced HTML Editor extension to build a password-protected Content Management Solution for a web site, that allows normal users to read news or text or whatever you choose to put on your site, while users with the correct password can add or amend the text using an intuitive word processor-like administration system - so your clients can maintain their own web sites without having to know HTML and without risking breaking the look and feel of the site!
Because Matt's using the extension and built-in server behaviours, there's no handcoding involved, so matt shows you how to use it using both ASP and PHP.
![]()
![]()
![]()
![]()
![]()
![]()
![]()
Creating the news_edit.asp Page
Okay, so we have the ability to add the news to our database, now we need to be able to edit it in case things go wrong (like that typo you missed, or some additional information).
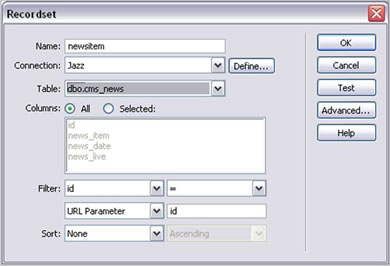
First we have to grab the record we are editing from the database. To do this we create a recordset using Server Behaviors > + > Recordset(Query)
We're just going to grab every field from cms_news, but filter it by the id sent in the querystring from news_admin.asp. That way we only get the unique record we need. We'll call our recordset newsitem. The dialog should look like this:
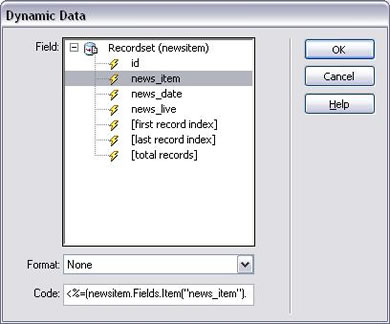
The HTML of the edit page is created much like the add page. The form contains an identical Advanced HTML Editor and other form elements. Unlike the add form, we need to set the form elements up to have default values. To add the default value to the Editor, click on the dynamic lightning flash by the value field. Select the newitem recordset and the news_item column, like this:
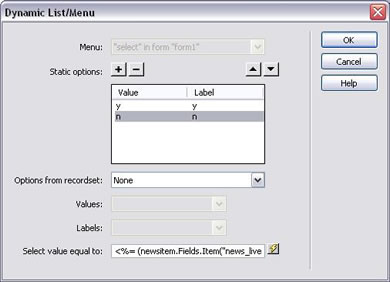
For the dropdown list, click the Dynamic button. Add the options y and n, and set Select Value Equal to be the news_live column of our recordset.
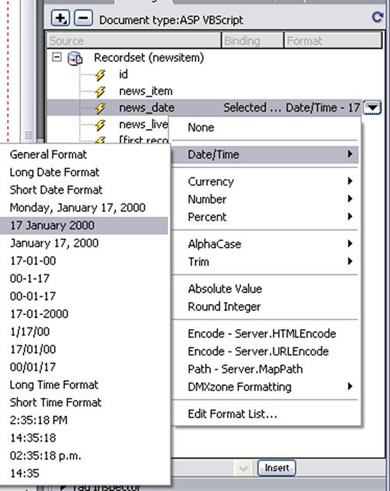
I've also added a brief “posted on: “ text, and inserted the added the news_date column from our recordset after it. I've formatted the date in a more human recognizable way too, using the formatting option available from the bindings dialog (see below).
To get the record to change when we submit, we add an Update Record server behavior. Click Server Behaviors > + > Update Record.
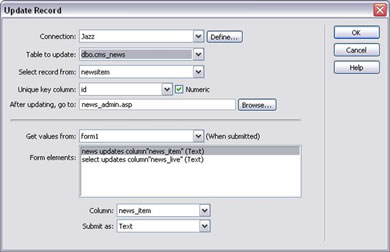
Fill in the form with the details as shown above. Select the correct database table and recordset to be used, and make sure the id is set as the unique key column. Be careful that your editor and select box are married up with the correct database columns (otherwise the update might try to insert the whole text into the space for a y/n answer!).
Finally, we again add the Restrict Access server behavior to keep out unwanted guests.
Creating the news.asp page
Last, but not least, we need to create the news page that will be visible to the general public. Open up new.asp and attach both stylesheets to it. Go to Server Behaviors > + > Recordset and go to the advanced option. Call the recordset news, and use the Jazz connection. In the window add the following SQL:
SELECT TOP 10 news_item, news_date
FROM c31.cms_news
WHERE news_live='y'
ORDER BY news_date DESC
This SQL grabs the news_item and news_date columns for the first 10 records in the database, but only if they are set to be live. It then orders them by the date they were added, highest first.
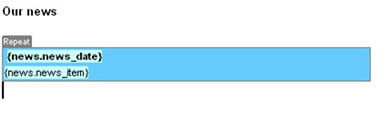
Next, we need to lay out our page. Fortunately we've kept things quite elegant. First add a main heading for the page (I used “Our News”). Underneath this we add a <div> tag. This we set to have the class news (if your stylesheets are attached properly this area should now go blue).
Inside the div, put a paragraph with the text date in bold and below that a piece of text with no Format option with the text news. It's important this text is not formatted, since all the formatting for our news is inside the database. Highlight the date text and go to the Bindings panel. Select news_date from the news recordset and click the insert button. The text {news.news_date} should replace your dummy text in design view. I also changed the format to something more human-readable using the Bindings Panel's Format dropdown. Highlight the news text and insert the news_item column.
Finally, highlight the entire <div> and add a Repeat Region Server Behavior. In the dialog that appears, select show all records (since we've limited the number by our SQL anyway). The final page should look like this:
![]()
![]()
![]()
![]()
![]()
![]()
![]()
Matt Machell
 A man of many talents, Matt has been a web designer, technical editor, and jewellery picker. He is currently on contract for the Birmingham City University, producing pages for research centres.
He has tech-edited a dozen books on web design and development for glasshaus, Apress and Sitepoint.
He likes music with loud guitars and games with obscure rules.
His website can be found at: http://www.eclecticdreams.com
He lives in Birmingham with his girlfriend, Frances, and a horde of spider plants.